One of the most mundane tasks that comes with writing a blog is moderating the comments to make sure your not being targetted with comment spam or abusive content. Most of the comment system providers have mechanisms in place to deal with these issues, but I thought it would be interesting to try and develop my own with the aid of cloud based AI.
Overview
In this article I use the term AI instead of Machine Learning to make the distinction between using an algorithm to learn how to solve a problem (machine learning), and using a third party system that has already been trained to solve a generic set of problems (AI).
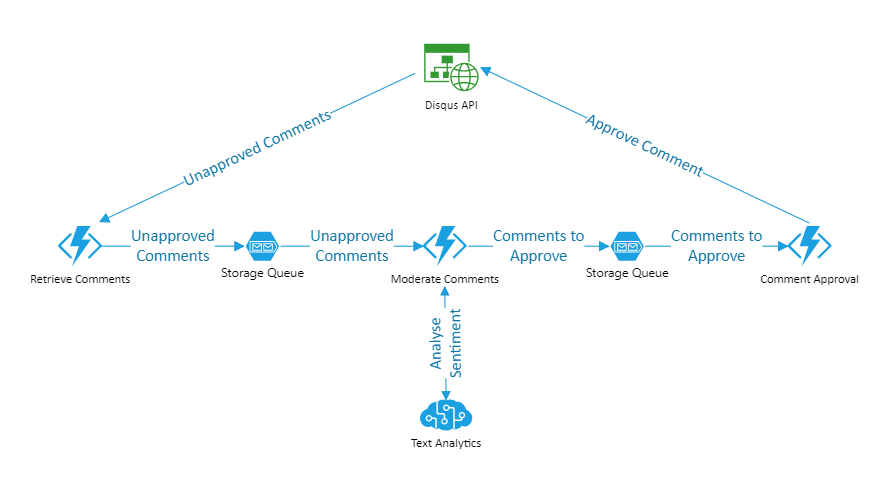
This blog uses Disqus to handle it’s comments, so my solution works as follows:
- Read unapproved comments using the Disqus API.
- Carry out a sentiment analysis of each comment using the Text Analysis API from Azure Cognitive Services to decide which comments should be approved.
- Use the Disqus API to approve the comments.
The application uses Azure Functions to carry out the processing, with individual functions handling each of the three steps above. Storage Queues are used to move data from one function to the next.
Disqus Setup
I needed to both retieve comments from Disqus and update the approval level on those comments. My first thoughts on looking at the Disqus documentation was to use their webhook to send comments to my application as they are entered, but it turns out that the webhook is only supported when using Wordpress. My other option was to use the API to retrieve comments using a scheduled function. As I would need access to the API to update the approval level of a comment, it seemed sensible to use API for all Disqus interaction.
In order to do that I created a Disqus application, and used that to get an API access token. To create a Disqus application, log in to your Disqus account, go to the API applications page and click the “Register New Application” button. The application registration process involves filling in a couple of pages of details about your applcation.
The first page asks you to provide a label (or name) for your application, a description, the name of your organization (I just entered “None”) and the url of your website. Confirming a CAPTCHA then clicking the “Register My Application” button will take you onto the second page.
On the second page enter the domain name of your website in the Settings: Domains section, set the Authentication: Default Access to “Read and Write” and set the Callback Url to a dummy domain (for example, http://example.null). Fill in the name of your organization again and enter the url of your privacy policy, then click the Save Changes button.
When the changes have been saved, you will be back at the applications list page. Click on the name of your newly created application in the application list and scroll to the bottom to get a valid API access token. You will need this token later when calling the API.
Azure Setup
For the cloud based part of the application I needed to use three Azure services, Cognitive Services, Function Apps and Queue Storage. The following sections detail how to set up each one.
Cognitive Services
To moderate the comments I used Sentiment Analysis to judge whether the comments where positive or negative. Sentiment Analysis is available through the Text Analysis API, part of Azure Cognitive Services. In order to access the API, I set up a Cognitive Services Text Analysis account via the Azure portal.
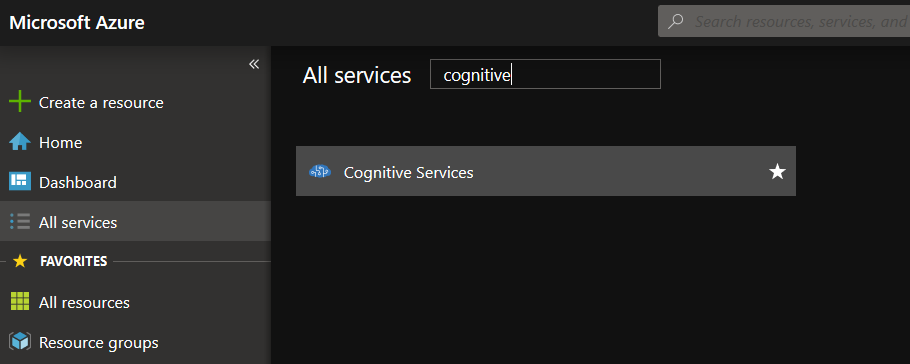
To do this, click on All Services and type “cognitive” in the search box. Click on Cognitive Services in the results list to select it.
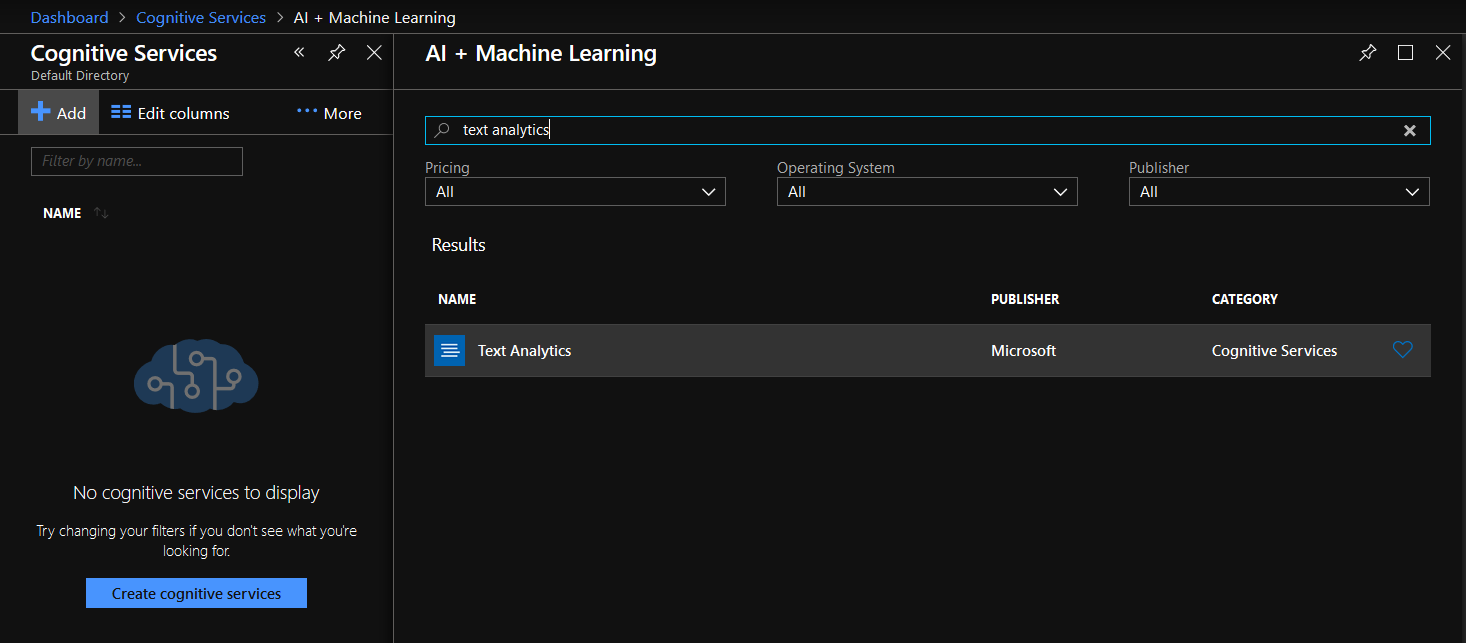
On the following page, click Create cognitive services, then type “text analytics” in the search box. Click on Text Analytics in the results list to select it.
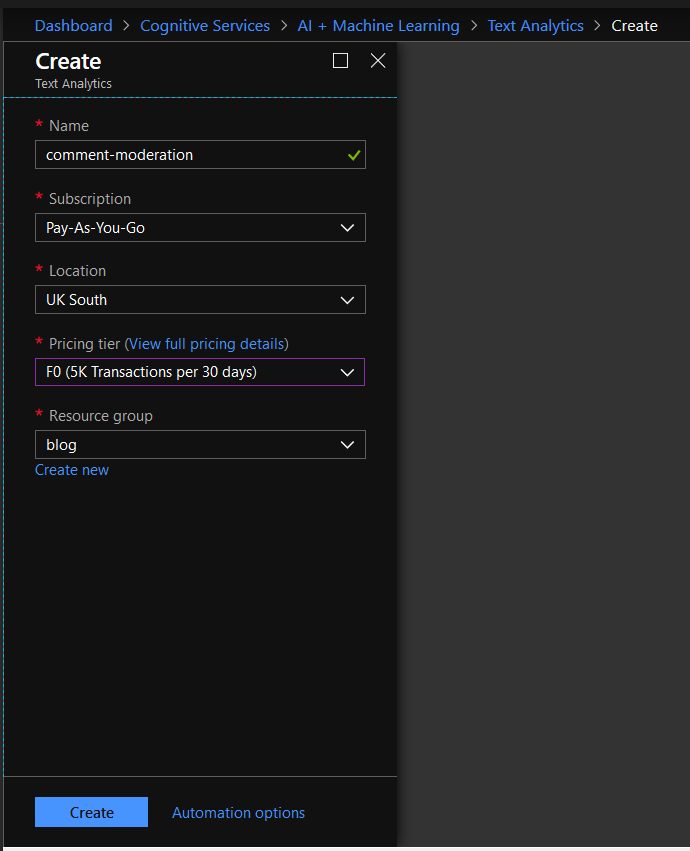
On the Create screen, fill in the details for the service. Using the F0 pricing tier allows 5000 free API queries per 30 days. Click the Create button to create the service.
Function App
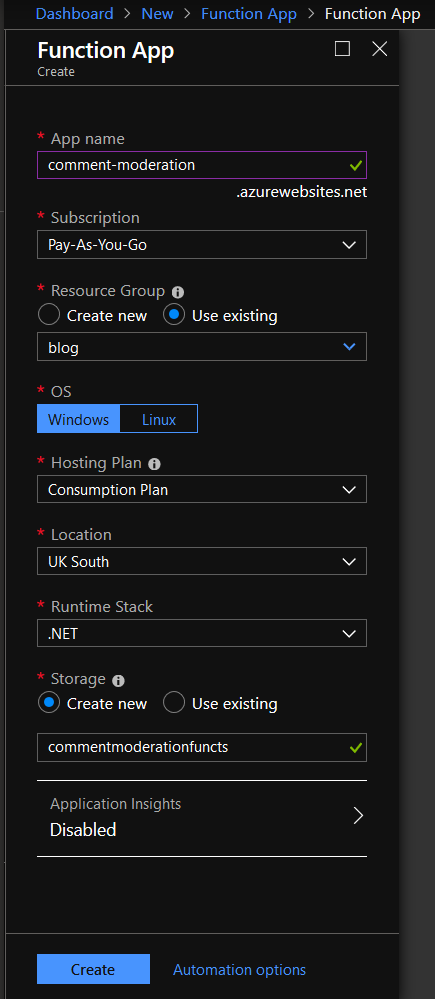
The code for the Function App will be deployed from GitHub, so I created an empty Function App with the following steps:
- Click on Create a resource
- In the search box type function app
- Click Function App in the drop down that appears
- Click Create on the description blade that is displayed
- Fill in the Function App - Create blade, choosing an App name (I chose comment-moderation), and completing the other fields, then click Create
Queue Storage
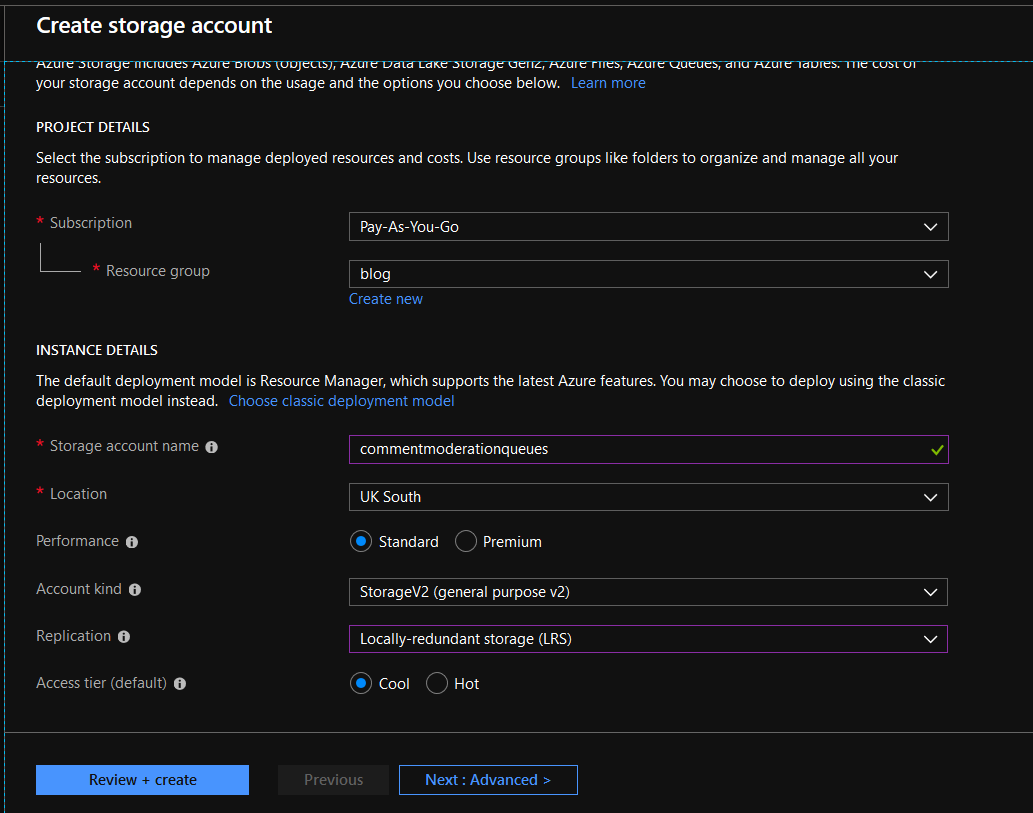
Finally I created a storage account called “commentmoderationqueues” to hold the queues that will be used to move data from one function to the next.
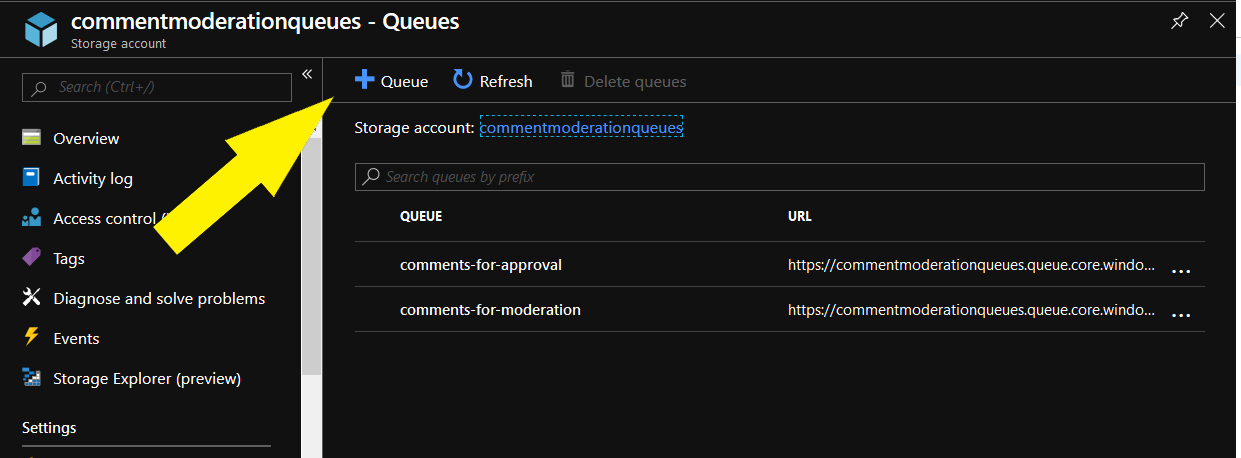
When the storage account was created, I clicked on Queues in the menu, then clicked the add button to add two queues
- comments-for-moderation - this contains all unapproved comments retrieved from Disqus
- comments-for-approval - this contains the id of all comments that should be marked as approved
The Code
After all that set up, it was finally time to get to some code. I developed 3 Azure Functions to handle the 3 different parts of the application. The full code for the application is available at GitHub.
- RetrieveComments - Retrieves all unapproved comments that where created in the last hour.
- ModerateComments - Analyse the sentiment of each comment and use its sentiment score to decide to approve it or not.
- CommentApproval - Approve the comments that passed the sentiment analysis.
RetrieveComments
This function runs on a timed trigger, once per hour. It reads all unapproved comments from the last hour and adds them to the “comments-for-moderation” queue.
public static class RetrieveComments
{
    [FunctionName("RetrieveComments")]
    public static async Task Run([TimerTrigger(("%RetrieveComments:TimerSchedule%"))]TimerInfo myTimer,
        [Queue("comments-for-moderation", Connection = "QueueStorage")]IAsyncCollector<DisqusComment> output,
        ILogger log)
    {
        var disqusService = new DisqusService();
        var startTime = DateTime.Now.AddHours(-1);
        var comments = disqusService.RetrieveComments(startTime);

        foreach (var comment in comments)
        {
            await output.AddAsync(comment);
        }
    }
}
The DisqusService is a wrapper around the Disqus API, and the RetrieveComments method is just a simple call to the “posts/list.json” endpoint.
public List<DisqusComment> RetrieveComments(DateTime start)
{
    var comments = new List<DisqusComment>();

    using (var client = new HttpClient())
    {
        var url = BuildRetrieveCommentsUrl(start);
        var result = client.GetAsync(url).Result;

        if (result.IsSuccessStatusCode)
        {
            var content = result.Content.ReadAsStringAsync().Result;
            var parsedContent = JsonConvert.DeserializeObject<DisqusResponse>(content);
            comments = parsedContent.Response;
        }
    }

    return comments;
}
ModerateComments
This function is triggered when entries are present in the “comments-for-moderation” queue. When a comment is received from the queue a call is made to the Azure Cognitive Services Sentiment Analysis endpoint. If the comment has a sentiment score higher than the threshold, its id is added to the “comments-for-approval” queue. The sentiment score threshold is loaded from a variable in the Application Settings of the Function App. The function logs the score each comment receives for monitoring and fine tuning of the threshold.
public static class ModerateComments
{
    [FunctionName("ModerateComments")]
    public static async Task Run([QueueTrigger("comments-for-moderation", Connection = "QueueStorage")]DisqusComment comment,
        [Queue("comments-for-approval", Connection = "QueueStorage")]IAsyncCollector<string> output,
        ILogger log)
    {
        var textAnalysisService = new TextAnalysisService();
        var score = textAnalysisService.GetSentimentAnalysis(comment.Raw_Message);

        var threshold = double.Parse(AzureHelpers.GetSetting("CommentScoreThreshold"));

        log.LogInformation($"Comment '{comment.Raw_Message}' scored {score}");

        if (score > threshold)
        {
            await output.AddAsync(comment.Id);
        }
    }
}
The TextAnalysisService is a wrapper around the Azure Cognitive Services Text Analysis API. The key part of the code is below, where the authentication key is loaded from Application Settings and the request is sent to the endpoint.
var url = AzureHelpers.GetSetting("CognitiveServicesEndpoint");
var key = AzureHelpers.GetSetting("CognitiveServicesKey");

var content = new StringContent(JsonConvert.SerializeObject(request), Encoding.UTF8, "application/json");
content.Headers.Add("Ocp-Apim-Subscription-Key", key);

using (var client = new HttpClient())
{
    var response = client.PostAsync(url, content).Result;
    if (response.IsSuccessStatusCode)
    {
        var responseContent = response.Content.ReadAsStringAsync().Result;
        var parsedResponse = JsonConvert.DeserializeObject<SentimentAnalysisResponse>(responseContent);
        return parsedResponse;
    }
}
CommentApproval
This function is triggered whenever a comment id is present in the “comments-for-approval” queue, It calls the Disqus API to approve the comment. Again, as in the RetrieveComments function, the DisqusService provides a wrapper around the Disqus API.
public static class CommentApproval
{
    [FunctionName("CommentApproval")]
    public static void Run([QueueTrigger("comments-for-approval", Connection = "QueueStorage")]string id, ILogger log)
    {
        var disqusService = new DisqusService();
        disqusService.ApproveComment(id);
    }
}
I deployed the application to Azure directly from GitHub as described in this earlier post.
Testing
After all this setup I got to test out the full process. I added two anonymous comments to a post on this blog, one positive and one negative.
- Positive - “This is so awesome”
- Negative - “This is bad and you should feel bad”
As expected, the positive comment received a high score (0.99537283182144165), whereas the negative comment received a low score (0.0061848759651184082). The positive comment was approved and appeared on the blog post, while the negative comment was left in an unapproved state.
The current value of the sentiment analysis threshold is 2, which is a bit arbitrary. The application will need monitoring over the next couple of months to refine this value to something more accurate.
Conclusion
As I’ve shown in this post, it is very easy to use prebuilt machine learning algorithms to carry out mundane tasks in your own solutions, without needing to understand the complex mathematics underlying them.